The capacitor mod eliminates in-game snapback by having the electrical signal that corresponds to the mechanical overshooting of the stick knob when released within flick inputs be 'evened out' by a capacitor.
Capacitors work by 'buffering' a signal, so that small, short changes are ignored, which is just what is appropriate for the snapback problem. Below you can see an oscilloscope reading of In case you are not familiar with the capacitor snapback mod:
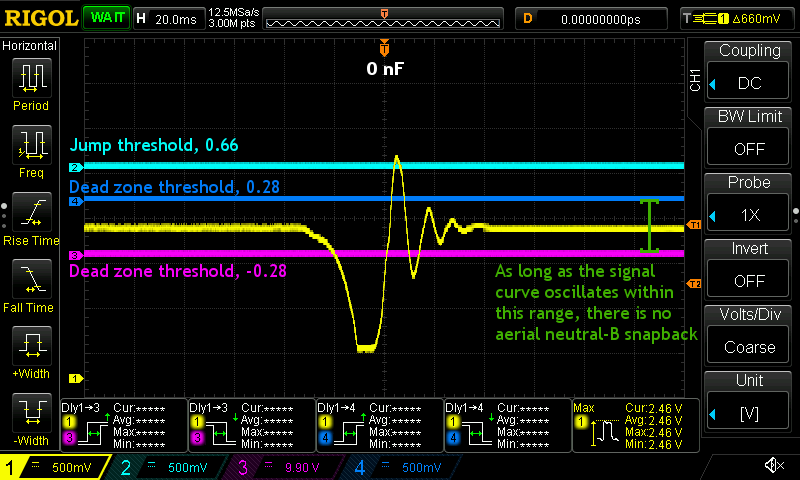

Left: no capacitor, right: 224 (220 nF) capacitor.
Important: Whenever you plug the controller into a running console without an Arduino, you'll have to recalibrate the controller by holding X+Y+Start for 1-3 seconds. Until you do this, there will be drifting due to the controller not calibrating properly initially with the capacitors. (Even if there is no drifting on the character selection screen, the control stick is not calibrated properly, so some inputs would be off if you skip the recalibration step.)
The only exception to this is the S2d option of the capacitor mod, which includes a circuit that I came up with in the January 2020 that spares you the trouble of holding X+Y+Start (see below).
For more detailed instructions, please refer to the "Usage and maintenance" section on the bottom of this page.
S2b: Modular capacitor mod (15€ one axis / 20€ both)
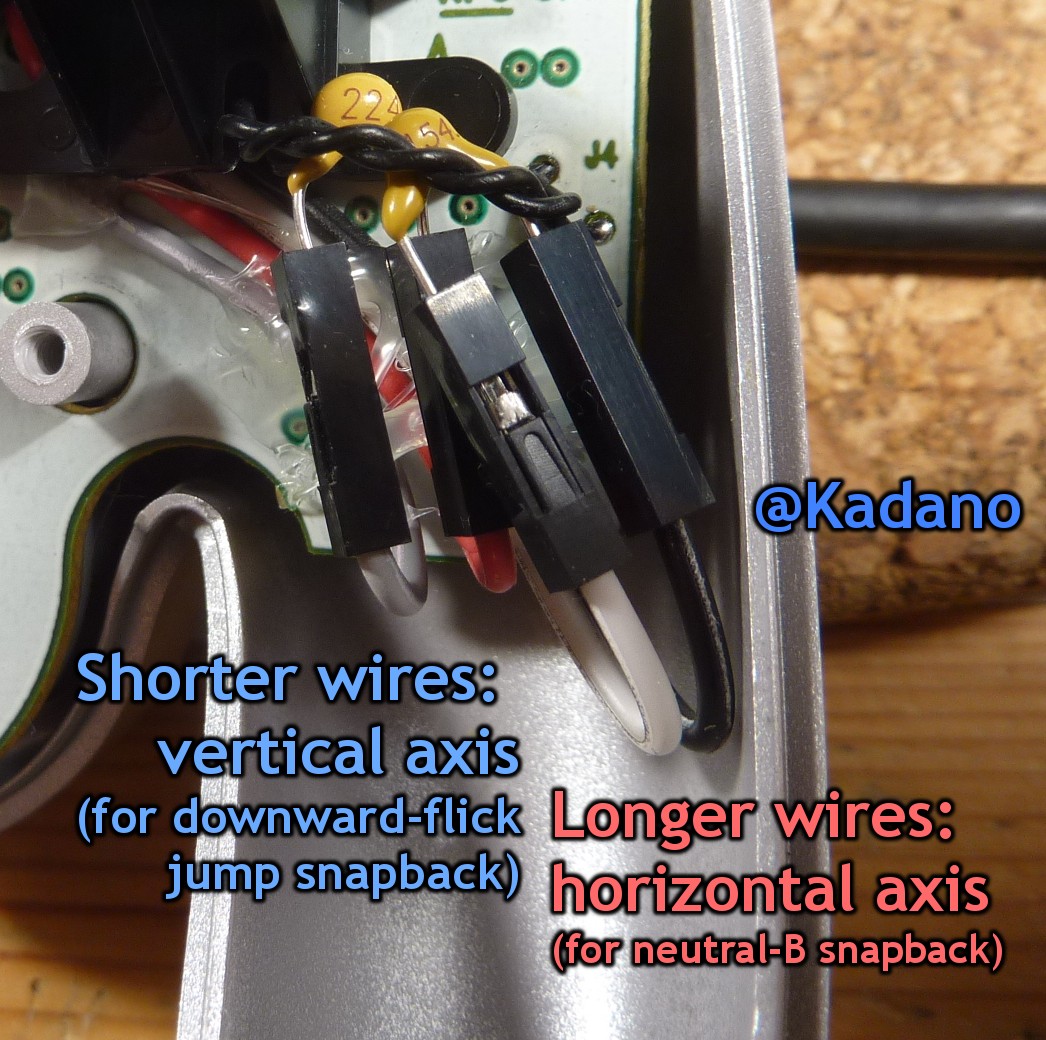
With the modular capacitor mod, there is a pair of wire slots for each axis that you buy:
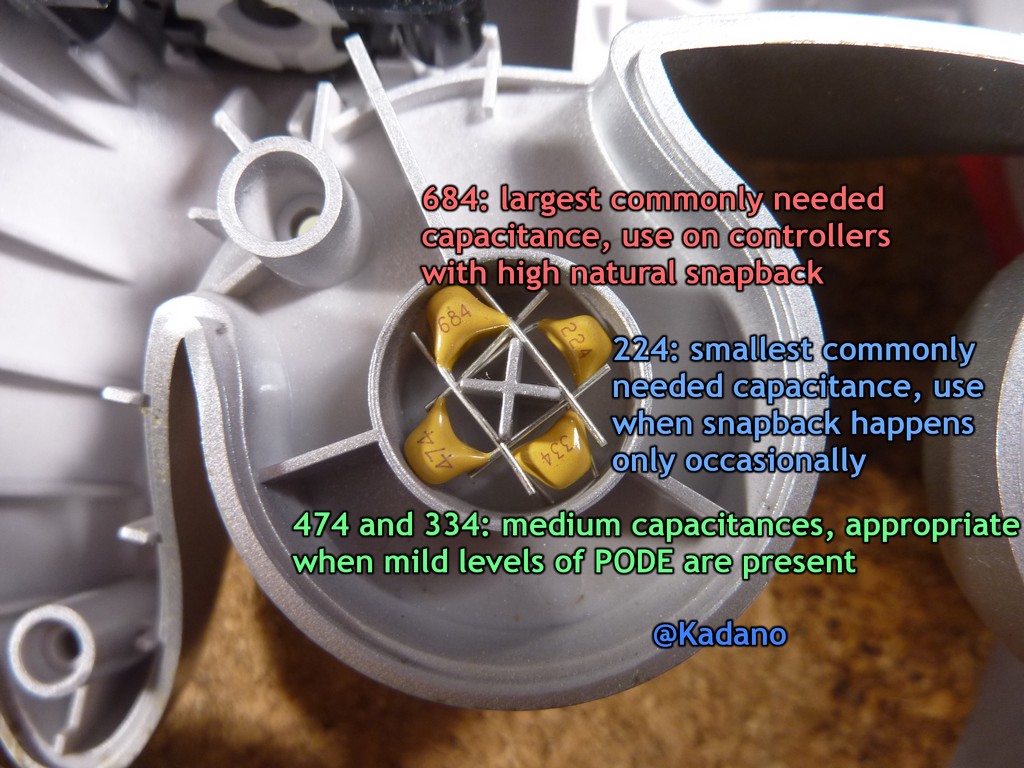
The capacitor I put into the S2b wire slot is the smallest one sufficient to keep the snapback signal curve within the dead zone limits for that respective axis and present PODE level, as decided from measurements with an oscilloscope. This capacitance should be seen as reference.
If you eventually do get snapback, you increase the capacitance in minimal steps for the according axis. The longer wires are for horizontal, the shorter ones for vertical. For example, if you sometimes get jump from downward flick, you would switch out the 224 capacitor that's put into the two wires reaching less far downward and put in a 334 capacitor instead.
If accidental jumps from downward flick still happen, you go another step up to 474, test again, and so on.
On the contrary, if you sometimes get sluggish inputs (for example, crouch jab becoming crouch dtilt or dash jump nair becoming walk jump fair), you'd switch to smaller capacitors, also with one step each (not skipping in-between sizes).
The spare capacitors you always get included with S2b are included in the back shell of the controller:
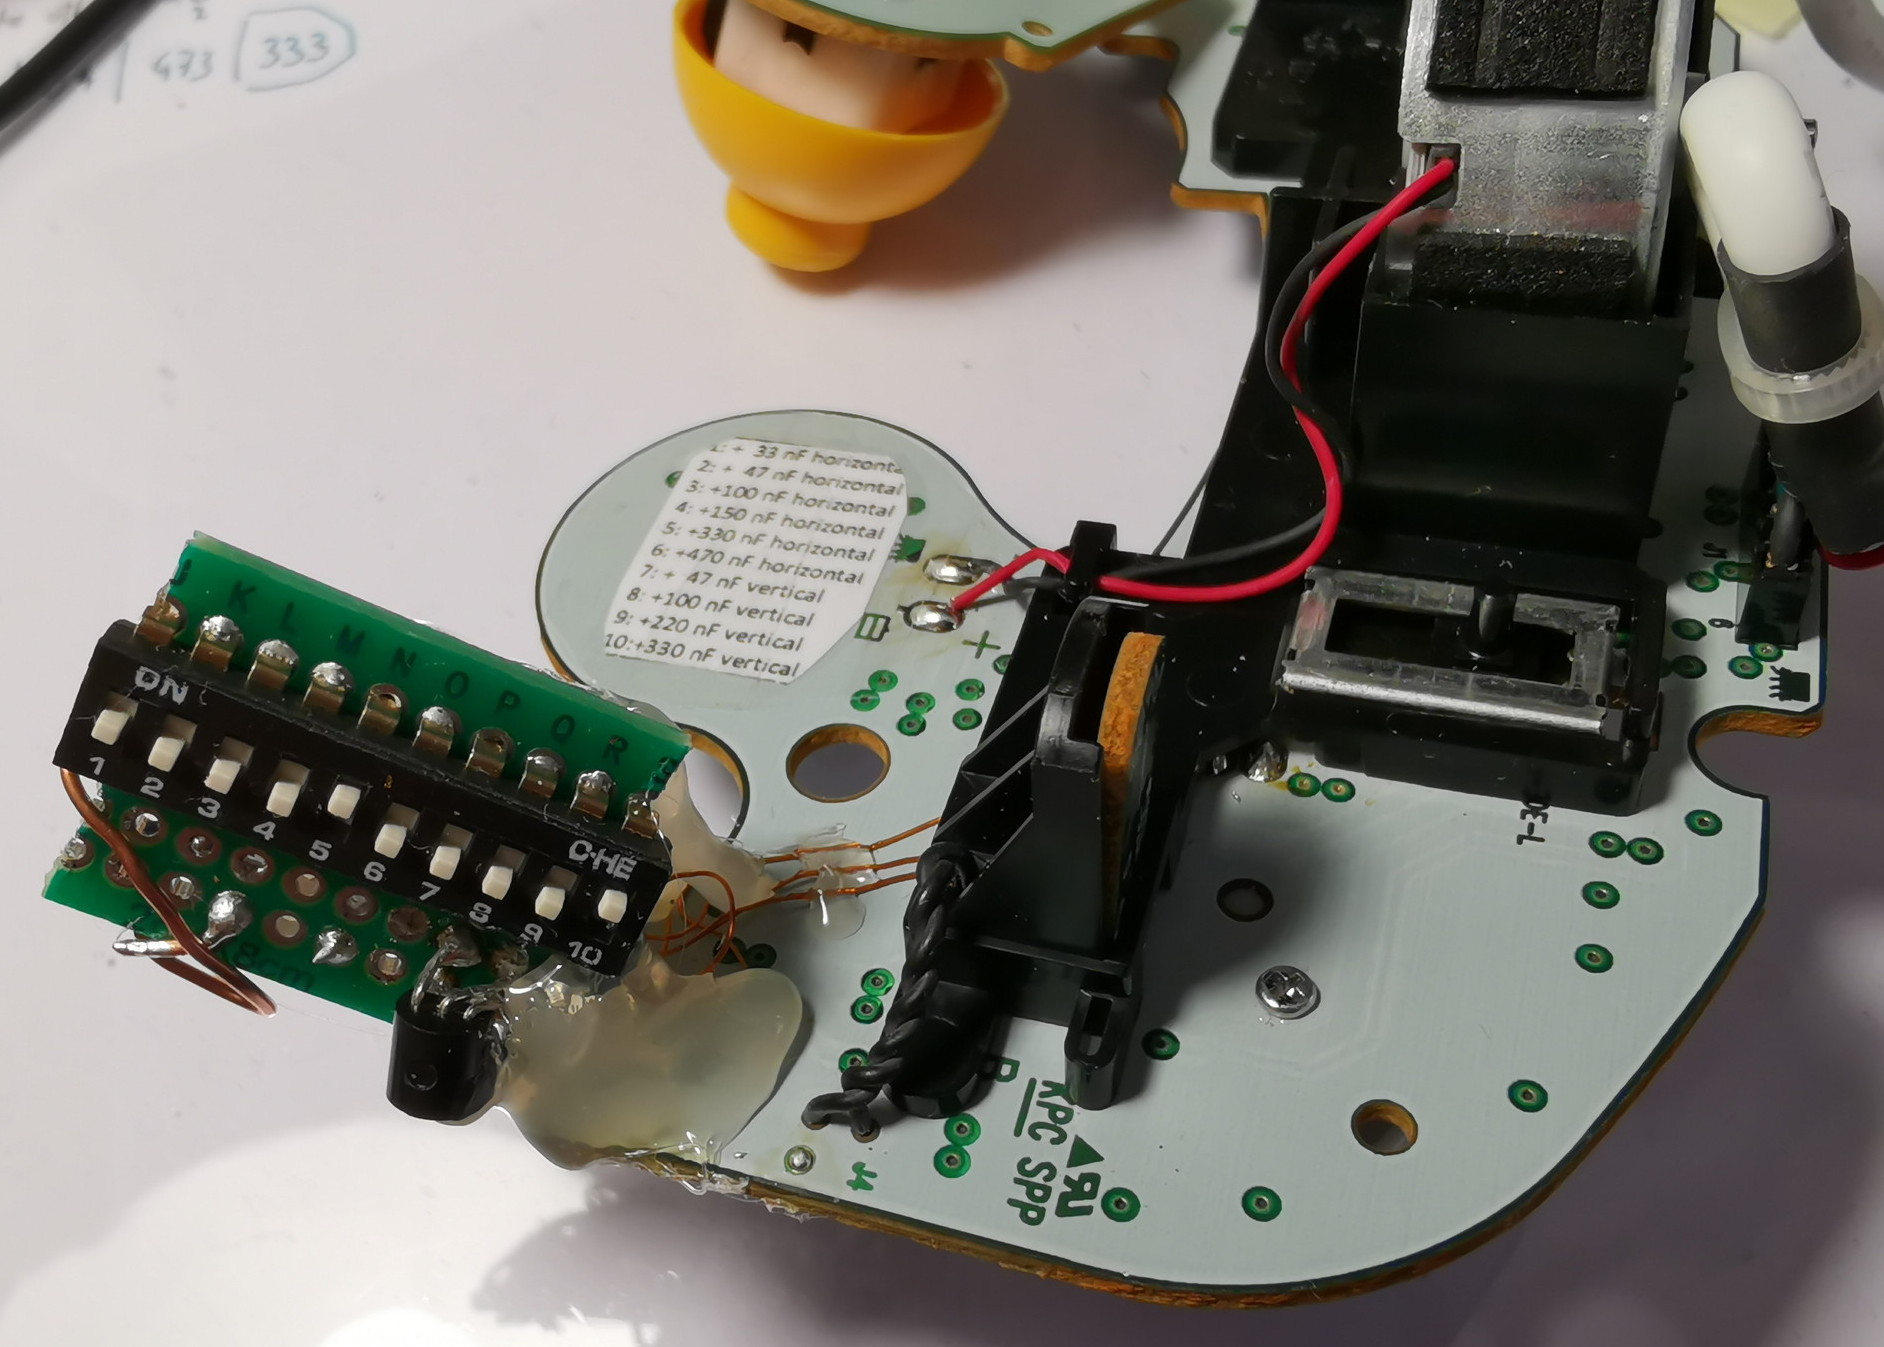
S2c: Toggleable capacitor mod (30€ 6x / 40€ 10x)
Here, instead of adjusting capacitance by replacing the capacitor in the slot, you do so by flipping switch. For each axis, there are switches that toggle one capacitor each, and by flipping some to 'on', you get the sum of their capacitances.
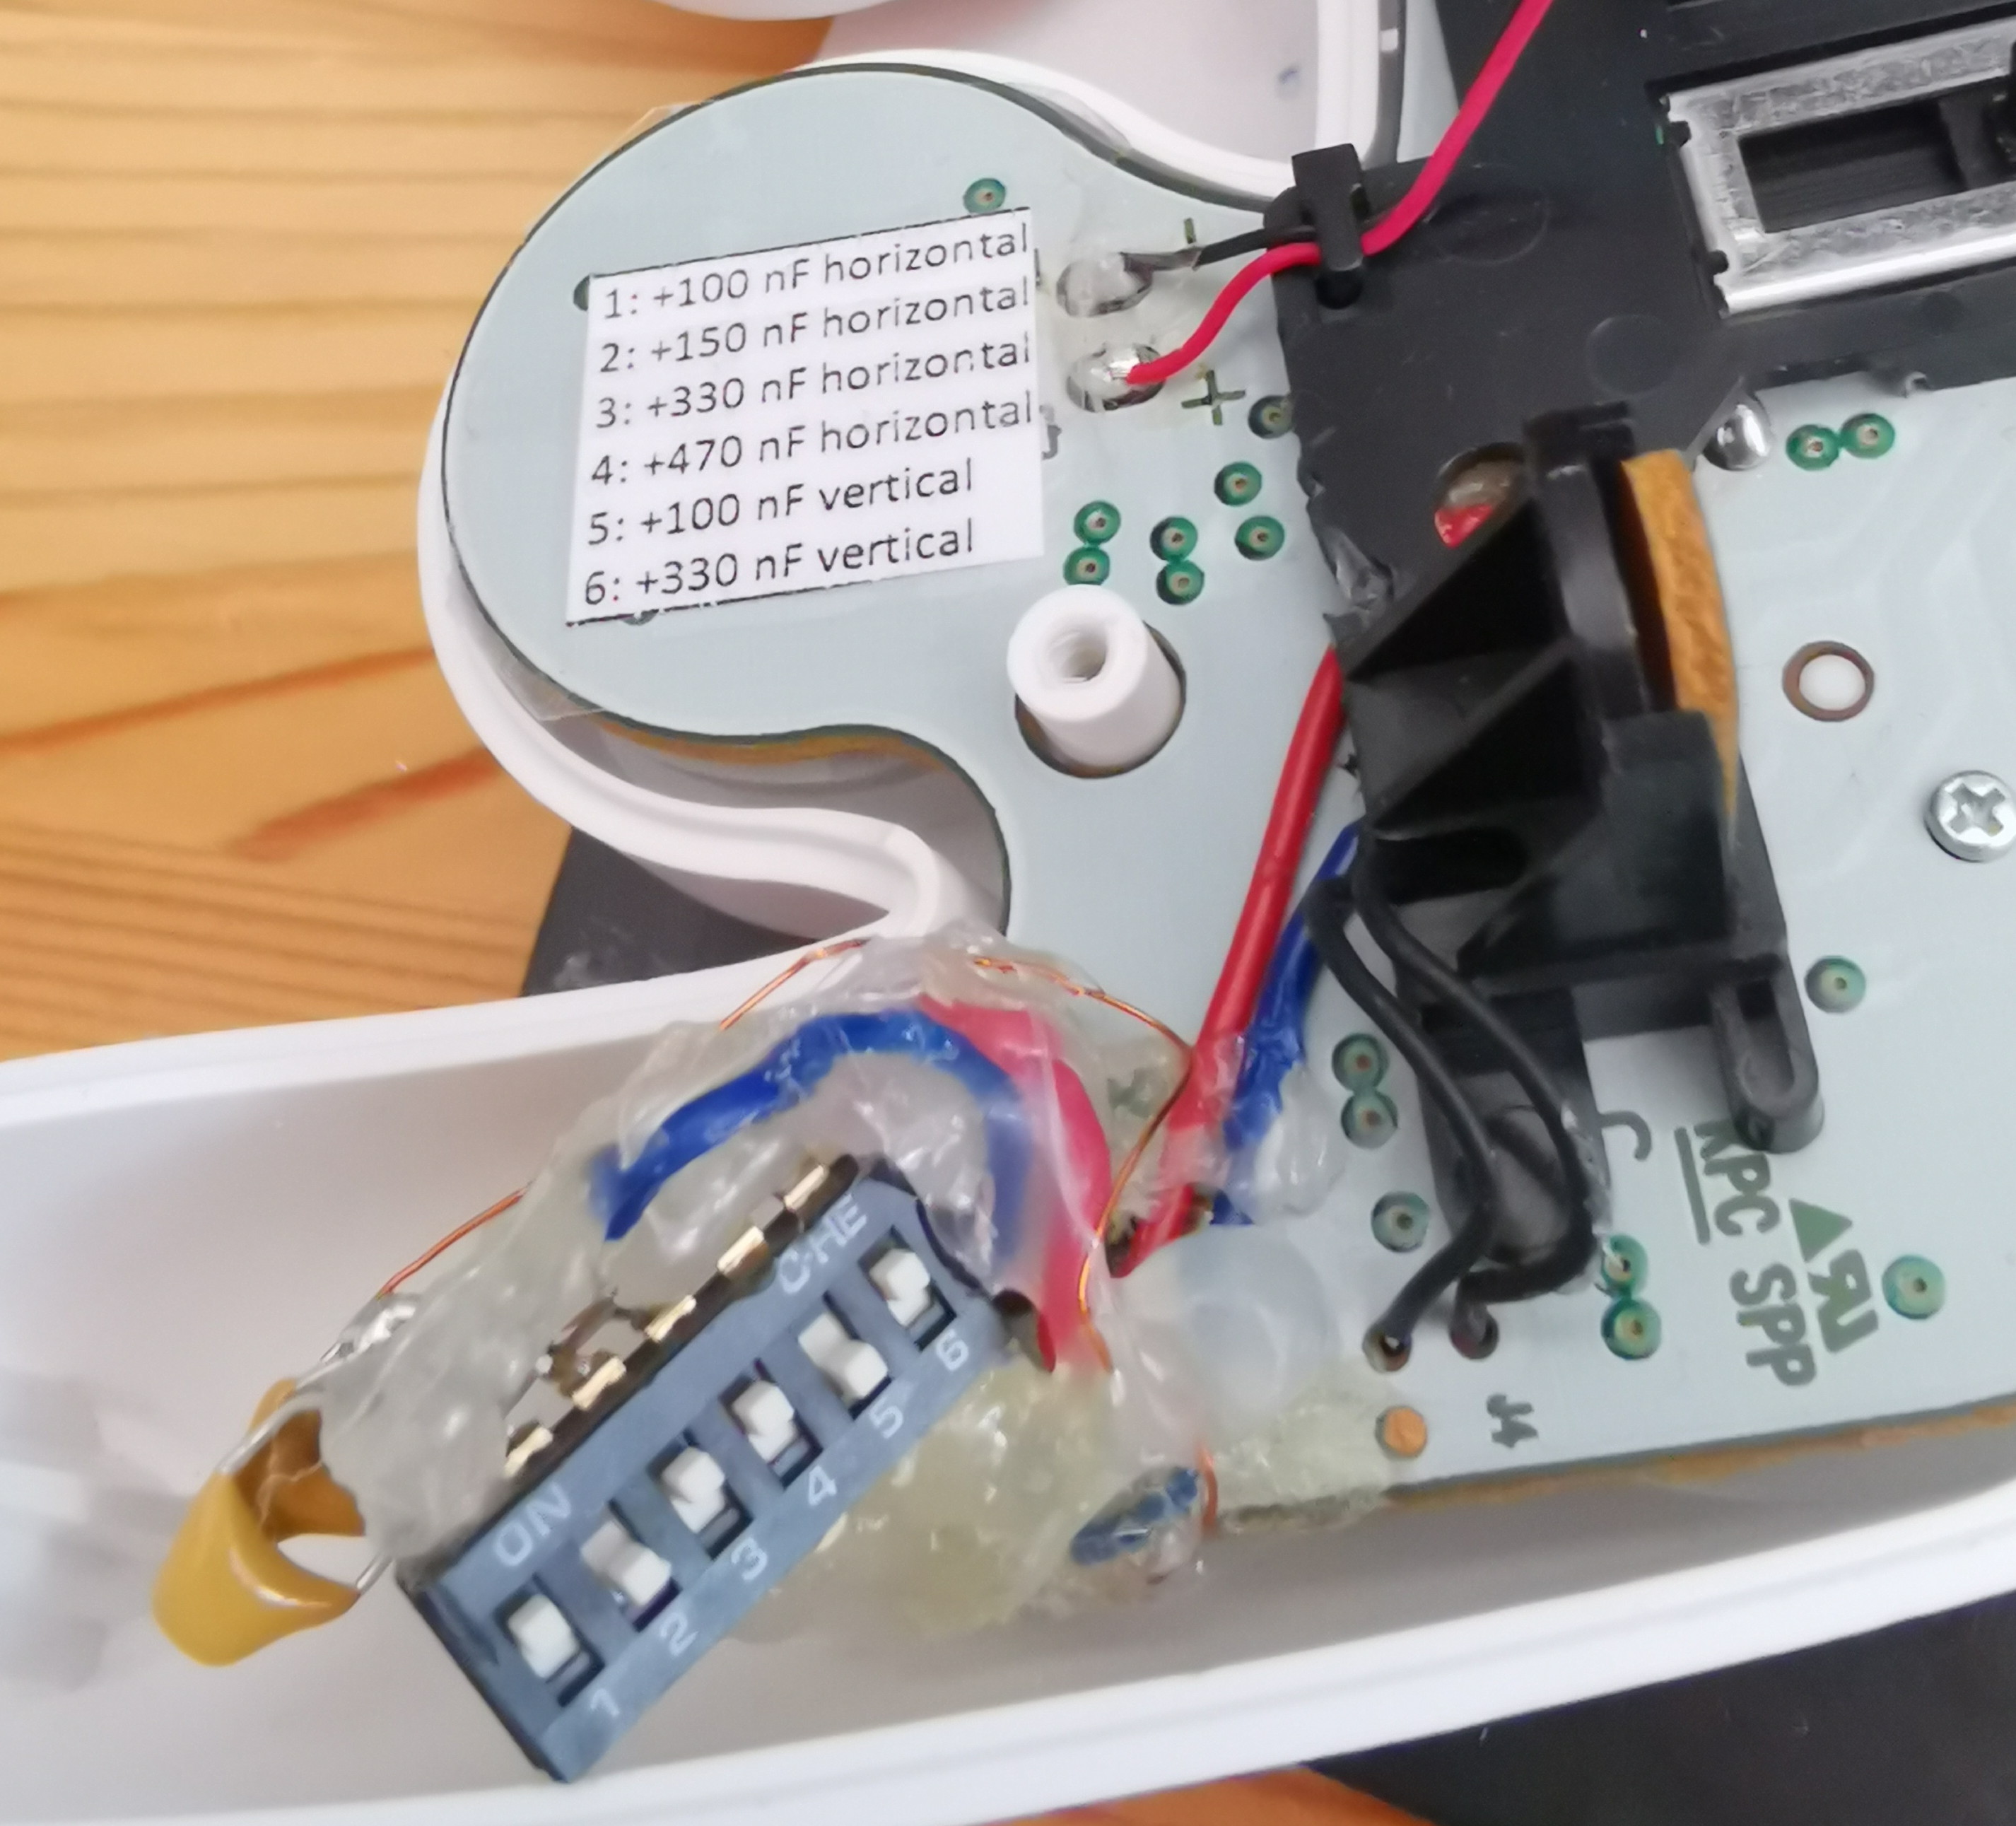
For example, on the controller above, with the configuration of the switches seen, horizontal capacitance is 900 nF (470+330) and vertical capacitance is 330 nF.
On the 10x switch installation, the horizontal axis gains additional 33 nF and 47 nF toggles (for fine-tuning to the current PODE level precisely) while the vertical axis gains a 47 nF and a 220 nF switch over the 6x switch installation.
In general, the 6x switch installation should be fine in most cases. The 10x switch installation can, however, in rare cases ensure that you can keep using a controller at its ideal sweetspot between consistent pivots & dashdances and no snapback for a while longer.
Once a controller has inconsistent pivots or dashdances even with all horizontal potentiometers disabled, you should send it in for servicing (replacement of the potentiometers). If you paid me the servicing fee within 6 months before, all servicing will be on warranty and thus free for you.
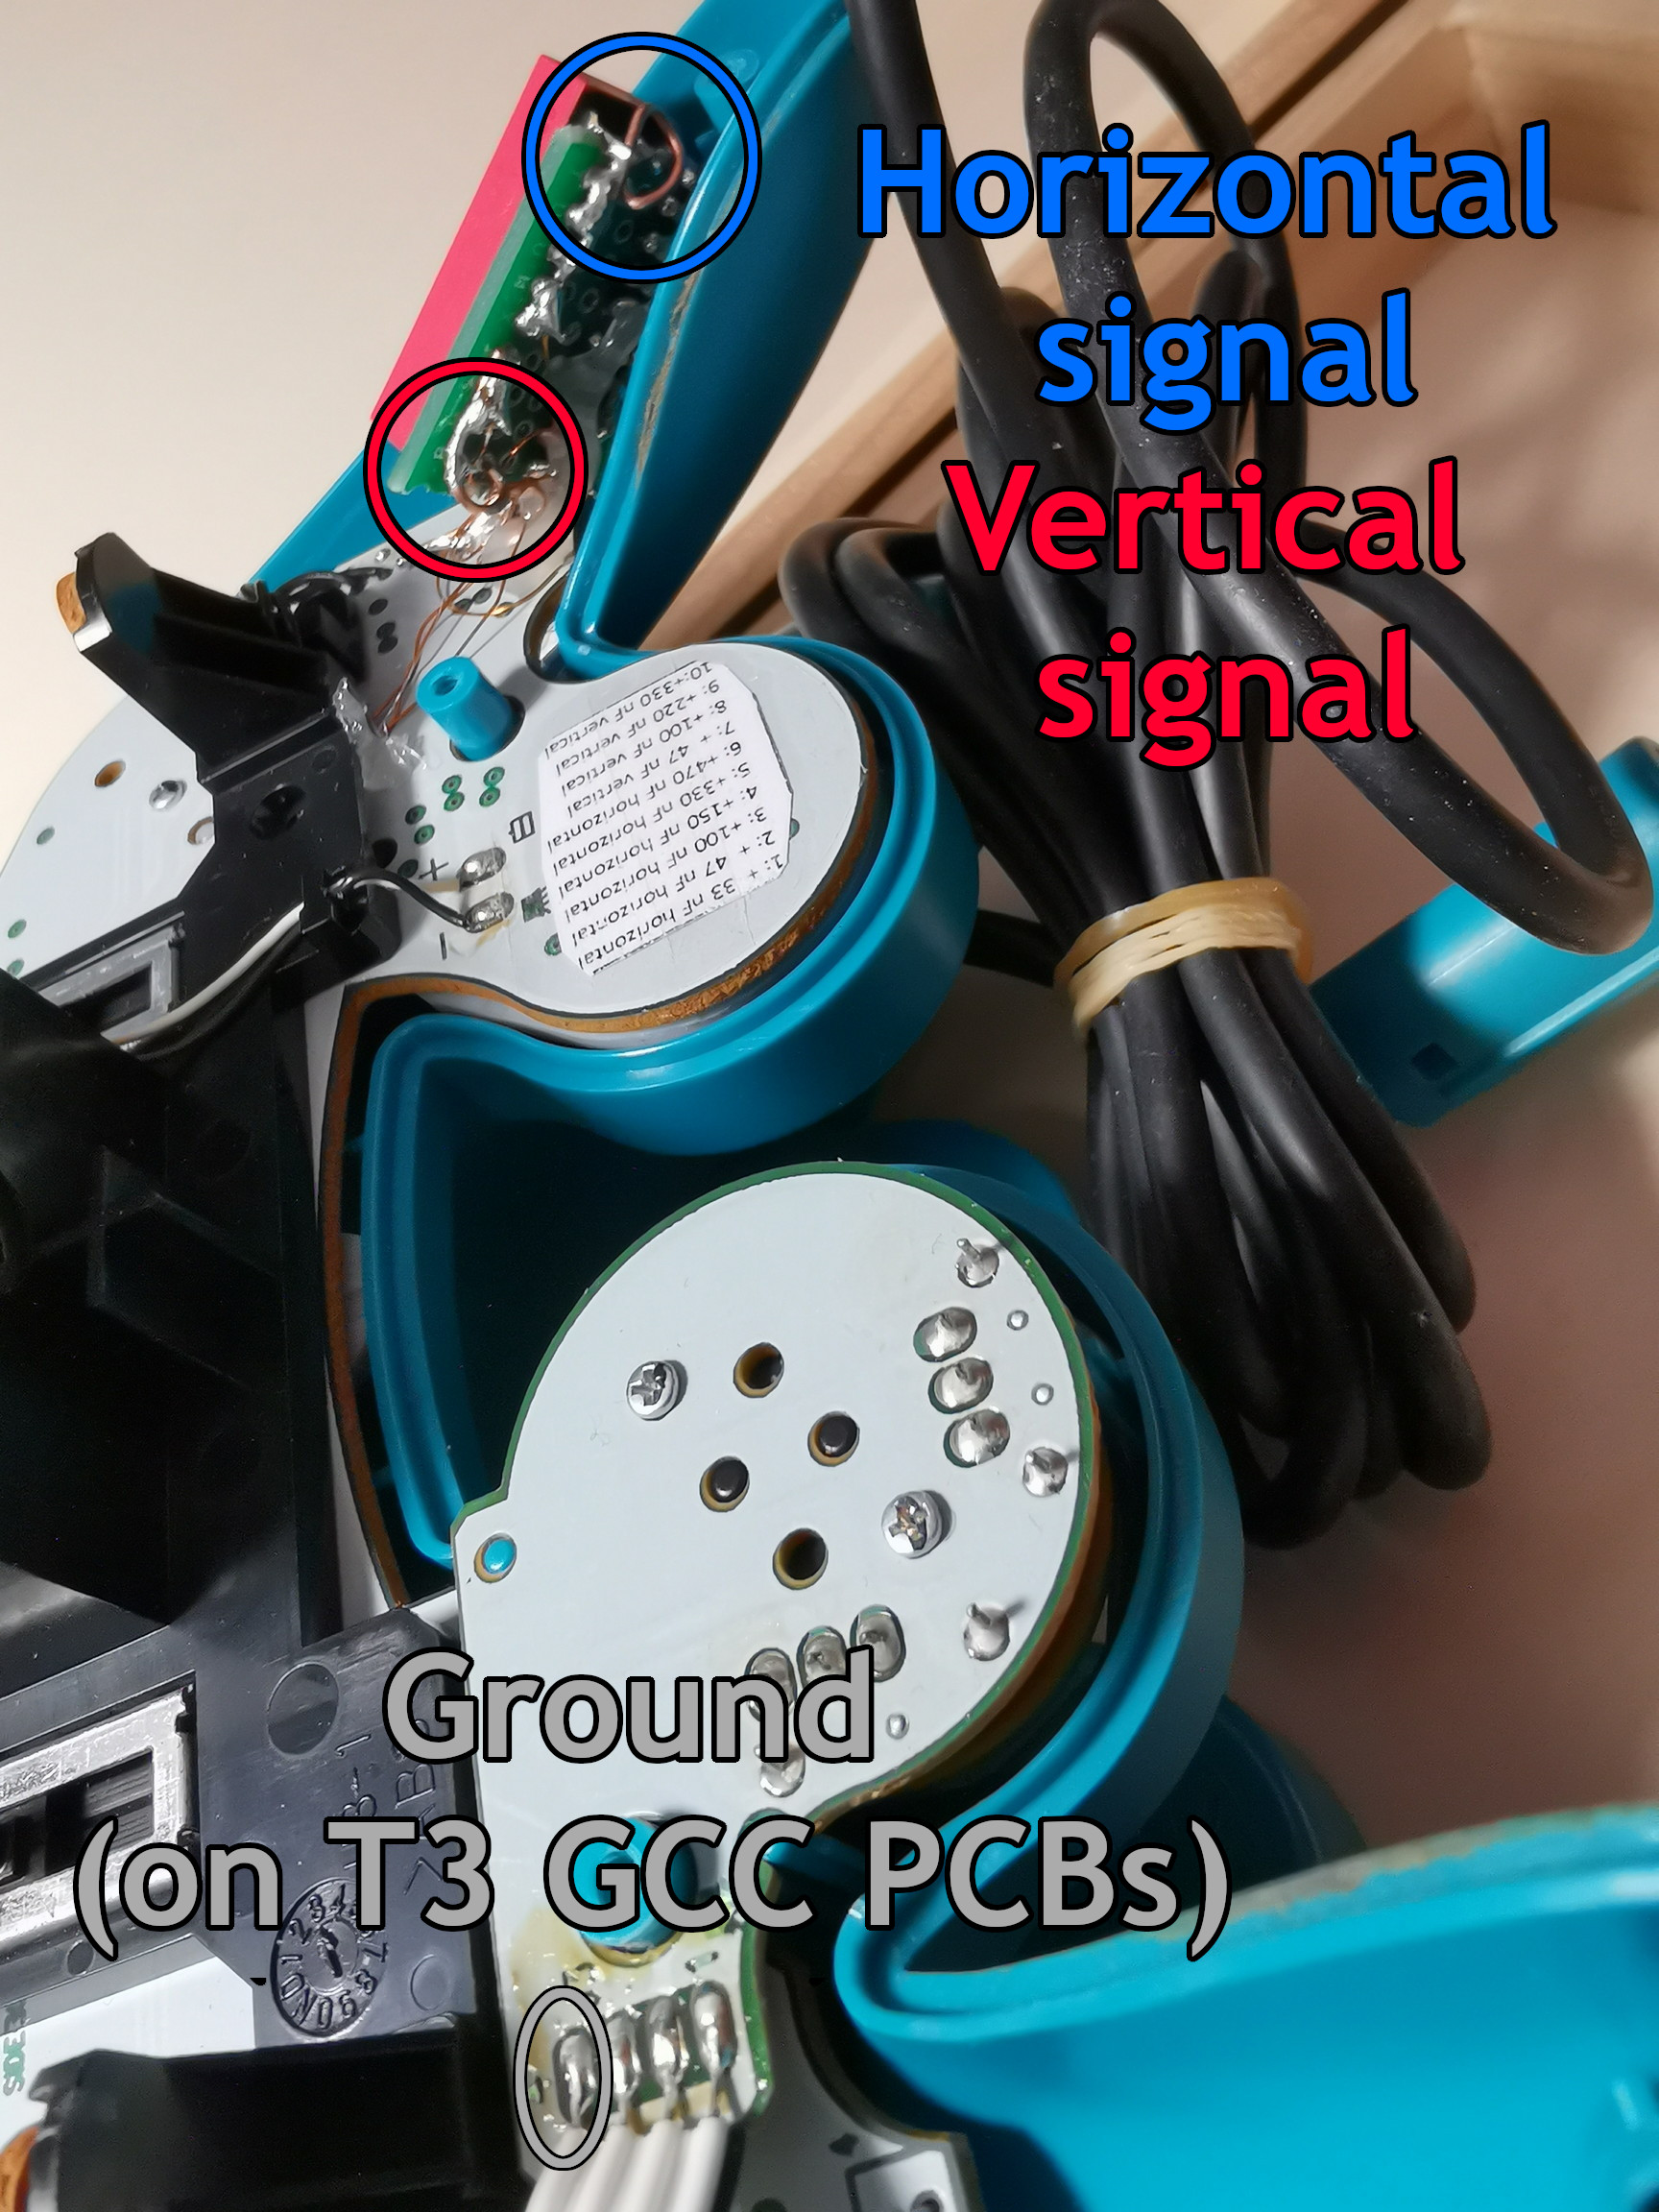
S2d: 10x Toggleable capacitor mod with No-Recalibration Circuit (50€)
This installation is just like S2c as explained above, however there is a tiny circuit included that fixes the controller calibration so that recalibration is no longer necessary. This circuit consists only of a few simple parts, there is no signal processing chip or anything else that might be troublesome in terms of controller legality.
S2d can be considered a luxury upgrade. In addition to the convenience of not having to recalibrate after plugging in, there are also three quick diagnosis copper loops for attaching an oscilloscope probe (ground, vertical and horizontal). The two signal ones of these can be accessed while the PCB sits within the front shell, allowing for quick and reliable testing using the C-stick daughterboard pin as ground.
This feature is practical if you have an oscilloscope with you or want to have your controller diagnosed by someone who does. Oscilloscopes are the most reliable and precise way to tell whether your potentiometer is worn out and needs the capacitance adjusted or be replaced, and with the S2d option, this checkup can be executed very quickly.
For controller technicians who work on an S2d installation, please refer to the picture below on the right for which copper loop carries which signal.
Usage and maintenance
When you receive the controller, the capacitances will be adjusted to the optimal level for the current condition of the potentiometers. After plugging the controller to a console, the cursor will drift as a consequence of the added capacitances. Because of this, it's necessary to hold X+Y+Start for 1-3 seconds (depending on controller board generation) to recalibrate the controller. This needs to be done after every time of inserting the plug to a console (unless you went for the S2d installation).
As you use the controller, the carbon tracks inside the potentiometers will get worn down and eventually electricity won't flow through them as smoothly and instantly.
This causes the rate at which the capacitor is charged to decrease, which will in turn mean that the effective voltage registered by the controller will lag behind what it's ideally supposed to be. Effectively, your control stick inputs will electrically be a bit delayed and lag behind the position that you are mechanically inputting. You notice this in-game in Melee by your pivots getting less consistent or by lingering inputs, for example dash jump nair intent becoming dash jump fair.
To get proper behavior (no snapback, yet minimal capacitance / potentiometer degradation delay), you thus have to decrease the active capacitance. On the S2b installation, you do so by sliding out the inserted capacitor and switching to a smaller one. On the S2c and S2d installations, you instead flip dipswitches so that the total capacitance for the respective axis is lower.
[example: S2b 684 out 474 in]
[example: S2c 474 off 334 on]
(to be completed soon)