Kadano.net //SSBM / GCC Shop


With the release of this website, all new orders (except from customers who previously ordered from me) will go through emails according to the format specified below. I no longer take requests on Smashboards or other messaging sites.
If you had made an order request to me before that I haven't fulfilled yet and you still want to go through with the purchase, please let me know where and under which username in your email.

Ordering process

Orders are open as of 2024-03-04.

Since I was unavailable for commissions from November to the end of February, there's quite high demand for my services right now, so it might take a bit longer for me to get back to you until about mid-April.
Please contact me by sending me an email to david.schmid1992[replacethiswith@]gmail.com.

Example for an order request, which is also the combination of modifications that I consider ideal for most people:


The total price for this order would be 414€. There is no need to list the individual prices in your order email, they are just added here to give a better idea of the total price to expect.

Starting in 2024, due to being taxed differently, all prices are subject to EU VAT if bought from any EU member state country (for example 20% in Austria). Since most of my customers are from North America, where there's no import tax on orders below 800 USD, and EU VAT rates vary from country to country, I've decided to only display the prices before tax is added.

Base prices and invoice process

The 75€ servicing, deep-cleaning, inspection and warranty insurance fee is charged per controller. This is to ensure that I can always afford to repair your controller ordered from me.

During the first six months after purchase, I do so entirely on my own cost, refunding your return shipping costs (up to 20€). (A partial exception to this is returning a controller after two months or more for analog stick performance issues from heavy usage within this timespan – in this case, I will still replace the potentiometers on warranty and return-ship the controller on my costs, but I will not refund your shipping costs to me.)

After these six months, I charge a flat service fee of 75€ per controller plus 15-25€ for international tracked & insured priority shipping. If there is only little needing to be reworked / cleaned, I'll give an appropriate discount.

The service fee of 75€ also applies if you send in a controller. It also includes deep-cleaning and electrical inspection, however if the controller was previously worked on by someone else, neither restoring those modifications nor undoing them (in case of faulty installation) is covered. For controllers that were stored in hazardous environments, such as in rooms that were regularly smoked in, there's an extra charge of 30€ for cleaning the residue from that with extra precautions.

Furthermore, if your controller has complicated defects, like PCB breaks from blunt impact that cause the controller to not work properly, I will charge an additional fee of up to 40€ to restore the controller functionality. This fee will only be applied if there is a complicated issue that takes me several hours to repair.


In addition to the 75€ service fee, if you order a controller from me, I charge a base controller price (depending on the model and condition as given below), prices for the individual modifications ordered and shipping costs.

The purchase contract is agreed on as soon as you have paid the invoice that I sent you. From the date of payment, I finish and ship every order within two calendar weeks. Usually, it takes 1-2 more weeks afterwards for the parcel to arrive, so expect to have the controller no later than one month after making the payment. The contract is considered fulfilled on the day that the controller is delivered to you in person, which is also from when on the 6 months of warranty count.
For payments, I accept bank transfer in EUR (for example, using TransferWise, if you are living in a country with a different currency) and credit card (through Wave invoice / Stripe payment). For local customers, paying with cash when picking up the controller is also possible.
I do accept PayPal payments, however due to their fees being higher, there is a surcharge of 2.5%.

As a small courtesy, I can put a small hand-written label on top of the controller as well as to the plug as an identifier, to prevent other people from accidentally confusing your controllers with theirs.
For doubles, this also helps with unplugging the correct player (if one team stays on the setup, for example).
I don't charge anything for this service. If you want me to do so, please include a note of the tag that you want me to write there. The labels withstand wet cleaning yet are easy to remove without residue.
In case the loose zone of the control stick exceeds 1 value in either axis, I will also denote the loose zone ranges in the format [horizontal|vertical] with the direction you should use for presetting the calibration.
See image on the right for an example. This is only relevant if you order any custom notches that need the extra precision from consistent calibration presetting.

Controller editions I have in stock

The deciding factor for the controller price is the PCB with its cable. Front and back shell colors can be exchanged for +10€ each, except for JP08 white (15€) and rare expensive colors like Emerald Blue (+20€ each per front or back shell of that color). Soldering on a different cord is +10€ (default colors) / +20€ (Emerald Blue).
Every used controller is cleaned thoroughly so that it's free from grease or dirt and looks as close to new as possible (save for the unavoidable few scratches).
For some controllers below, I have put example condition photos. Of all the controllers with photos linked I have also measured their button resistances. You can find them in this spreadsheet. If they are grayed out at the bottom, they have been sold already.

Edition IDEdition namePrice rangePhotoStickbox typesCurrent stock
SB2018JPSmash Black 2018 JP, new with box50€330
SB2014DESmash Black 2014 DE, new with box90€314
SB2014JPSmash Black 2014 JP, new with box90€32
SW2014JPSmash White 2014 JP, new with box120€32
JP08Japanese White 2008, near-mint with box120€31
JP08NMJapanese White 2008, near-mint100€235
JP08LUJapanese White 2008, lightly used85€1 4315
JP08MUJapanese White 2008, moderately used65€535
JP08HUJapanese White 2008, heavily used45€631
JPCLJapanese Clear / Transparent, lightly used120€30
PLUPlatinum, near-mint (type 3 only) 2021 Platinum T3 stock photos90€30
PLUPlatinum, very lightly used (type 3 only)75€34
PLUPlatinum, lightly used (type 3 only)65€32
PLUPlatinum, moderately used (type 3 only)50€33
PLUPlatinum, heavily used (type 3 only)40€33
PLUPlatinum, moderately used (type 2 only)40€22
PWUPearl White, moderately used50€2,30
EBNMEmerald Blue, near-mint (type 3 only)110€33
EBVLUEmerald Blue, very lightly used (type 3 only)90€2 32
EBLUEmerald Blue, lightly used (type 3 only)80€3 34
EBMUEmerald Blue, moderately used (type 3 only)70€31
OST3Orange Spice, lightly used (type 3 only)70€33
OBT3NBOld Black, new with box120€31
OBT3LUOld Black, lightly used70€33
OBT3UOld Black, moderately used60€34
OPT3UOld Purple, moderately used70€31
OBBOld Black, used with box, new type 2 stickbox70€21
OBT2UOld Black, moderately used35€24
OPT2UOld Purple, moderately used35€24
OST2UOrange Spice, moderately used40€23
OBFOld Black, new T4 stickbox (high tension, but not suitable for precise notch values)35€44
OPFOld Purple, new T4 stickbox (high tension, but not suitable for precise notch values)35€44
OSFOrange Spice, new T4 stickbox (high tension, but not suitable for precise notch values)35€43
HBUHori Blue transparent, used, with full A2a hybrid gate (already applied)140€31

[S] Stickbox servicing / mechanical tuning category

Options here change the way the control stick feels and responds in terms of mechanics.

[S0] Mandatory service & warranty fee [75€ per controller]

For every controller, whether you order it from me or send it in for me to work on, I charge a service fee of, at the time, 75€. This fee covers my basic service, including but not limited to: deep-cleaning the controller, electrical inspection with an oscilloscope, extensive report of the state of the controller and its problems, detailed email correspondence in order to work out the controller configuration that works best for you.

When you choose a brand new in box controller from me, the S0 fee is reduced to 50€, as no deep-cleaning is required.

Only on controllers that I have worked on before, the service fee also includes replacing all potentiometers that show signs of degradation with new ones (S1a). On controllers sent in for servicing, you can have me replace all 6 potentiometers (4 for the sticks and 2 for the triggers) with new ones regardless of performance for an extra 20€. To order this, please list [S0b] in your request list.

As part of the S0 fee, you get 6 months of full warranty. In case anything about the controller does not work as advertised or promised, you are eligible to have me repair the controller to proper function, all covered by me.
Exempt from this are damages caused by the user by mistreatment, like spilling fluids on the controller or throwing it against a hard surface.

If the degradation in the controller function stems from excessive wear on the controller by the user, like playing more than 20 hours per week with high input speed and strong force, covering repair of worn potentiometers on warranty will only be partial. My work on it and the return shipping to you will be free, but your return shipping costs to me will only be covered within the first two months in this case.

[S0Phob] PhobGCC mainboard upgrade service & warranty fee [190-220€ per controller]

For customers who want to use a PhobGCC mainboard, I install those both for sent-in controllers and for controllers bought from me. For this service, I charge a service fee of 220€ (instead of the 75€ for a regular mainboard controller). Going with a type 3 controller as a base is strongly recommended. The 220€ price includes new trigger potentiometers, the full Phob mainboard (2.0.2 or 2.0.5) and mouse-click Z switches. (If regular Z switches are preferred, the Phob upgrade price is 190€.)

PhobVision installations are also available for +50€ (direct mount) / +30€ (reference). With the reference installation, there's a cable going to the black rumble motor holder that needs to be unplugged manually every time you open the controller, right after lifting up the backshell just a bit. With my direct mount installation, the cable is glued to the back shell and automatically unplugs when you lift up the back shell, so the risk of breaking the cables when removing the backshell too strongly or too quickly is eliminated.

For anyone who's interested in buying a Phob controller, I recommend asking the modder they want to buy from for photos of the solder points of the last controller they worked on. You can find a gallery of Phob controllers I made here, and here is a post from fellow trusted PhobGCC modder Nuckels with some more example photos of what looks good and what's inacceptable.

Mouse click Z switch options and their average click resistances: Kailh mini blue (48gf), Omron D2LS-21 (55gf), Kailh mini TP grey (58gf), Omron D2LS-11 (121gf). For reference: stock Z switch only is 40 gf, typical effective resistance (with spring that I remove for mouse click Z): 250 gf.

[S1] Potentiometer replacement / PODE removal [4-6€ per axis]

PODE in strong degrees usually makes inputs like pivots, backdash out of crouch and C-stick inputs less consistent. Severely worn potentiometers can even drift, making playing very frustrating and borderline impossible. By opting to have your potentiometers replaced for new original potentiometers, you get rid of PODE. For more information on PODE and how degrading potentiometers affect your input, please check out this quick diagram on Twitter and this longer information page on potentiometers, their degradation, capacitance and snapback.

Opting for S1 also means that the controller doesn't get high 1-frame backdash consistency on vanilla Melee, unless coupled with an Arduino installation, as without UCF or Arduino, those can only be accomplished by PODE.

Also, snapback will be present initially (until PODE develops), since that can only occur 'naturally' from PODE. So if you use aerial neutral-B at all, I recommend to couple this mod with a modular capacitor mod (S2b, S2c or S2d (see lower section)).
I offer four subtypes:

The lifespan depends mainly on how much you actually move the control stick. If you play 10 hours per week or more with a movement-intensive playstyle, you have to expect the potentiometers to be mostly worn out by the lower end of the lifespan estimate (4-6 months).

In general, I recommend having the potentiometers replaced only on controllers that you send in to me that you've either been using for a year or more or that you've been using heavily for 6 months or more.

Since potentiometers are the controller part that gets worn down the most from usage – like chain and brakes of a bicycle – I only give a 3-months warranty on their function. Replacing all faulty potentiometers with new black Noble ones is part of the 75€ servicing fee on controllers that were originally bought from me and last serviced by me.

S1LR: The analog sliders of the L and R triggers can also be worn out and develop drifting, which causes issues like the shield fading away slowly on unpressing or getting accidental rolls after L-cancels.
Trigger potentiometer replacements are 6€ each. I only solder Noble ones (white wiper, black dots; leftmost in the picture on the right), as these have the longest lifespan.

[S2] Snapback removal by capacitor mod [5-40€]

Due to the stick knob having physical mass, it's technically completely normal for there to be snapback when doing flick-type inputs. The controllers that don't have snapback without being modified only do so because of PODE (potentiometer degradation), which is a technical malfunction.
The only proper way without side-effects of removing snapback is the capacitor mod. I offer four different sub-types:

  1. [S2a][5€ per axis] SMD installation:
    Not user-serviceable (unless you have a high-quality soldering iron and are experienced in using it properly), permanent installation. Not generally recommended for this reason.
    The only possible case in which this is a good option is if you are set about never opening the controller, always sending it to me for servicing if there is a problem. Typically, the parts that get faulty first are potentiometers. By stepping down your capacitance gradually, you can keep your potentiometers at ideal performance (no snapback yet no noticeable input drifting or delay) for roughly twice as long (4-9 months vs. 6-18 months).
    For more information than given below, please refer to the S2 information subpage. I also wrote an even more detailed guide about capacitor mod installations as well as how they are affected by potentiometer issues here.
  2. [S2b][15€ per axis, 20€ for both horizontal and vertical] Modular female jumper wire installation:
    Easily user-serviceable, only a tripoint screwdriver is required (simple one added for free, or a high-quality magnetized one for +3€). Here, you can then step up or down from the default capacitance I insert accordingly to the amount of snapback and PODE measured with my oscilloscope as PODE decreases or increases.
    S2b for both axes is the default recommendation if you want something simple and affordable that works. S2c and S2d below are more luxury versions that can be adjusted by you more quickly and easily, with no hassle of having to store spare capacitors. But beyond that and, with S2d, the benefit of not needing to hold X+Y+Start, they still do the same thing.

  3. [S2d] [40€ for both axes together] Multi-switch installation 10x, no-reset circuit:
    Much easier to adjust for the user than the legacy S2b installation: A very wide range of effective capacitances can be covered by coupling them additively by flipping individual switches, for covering varying amounts of snapback and PODE. Has the advantage of not having to pull capacitors in and out. Pre-printed professional looking boards with an integrated No-Reset Circuit that I came up with in early 2020 that fixes initial calibration so that you don't need to hold X+Y+Start after plugging the controller into a console, unlike the more simple capacitor installations.
    In general, I recommend this to customers with some technical understanding of controllers, capacitors and PODE, who are likely to bring their tripoint screwdriver everywhere to performing slight adjustments on the go.

  4. [S2e][new in 2022!][45€ for both axes together] Multi-switch installation 10x, no-reset & modular design with front wiring:
    A modified version of S2d that has several improvements. The wiring now goes to the front, so if you plan to solder new potentiometers by yourself, you won't need to move the four wires out of the way and resolder them every time you replace the potentiometers. Additionally, the snapback module can be completely disabled or exchanged (in case the switches turn faulty, which is rare but not impossible) without soldering as it is snapped in place to the base module.
    Finally, there's a daughter module slot into which you can snap extra function modules, such as resistance path daughterboards that accomplish the same functionality as "heartbeat" modules, which is supposed to extend the effective functional lifespan of a given set of potentiometers. If future research shows that different schematics are more beneficial, you can upgrade to those easily as they will support the same pinout.
    Please note that these resistance modules are still in the experimental stage and I can't guarantee that you'll find their effect beneficial. Right now this is mainly a feature for people who like to play around with different settings, more testing is needed to confirm that effective potentiometer lifespan is really extended. You can find a short condensed version of my testing results so far in one of the photos of my Etsy listing of these modules, and a longer version in my Google photos album (annotated).

[S3T3] Stickbox replacement (almost-new T3) [+20€]

For controllers with type 3 stickboxes, I can put in an almost new original type 3 white stickbox for +20€, lubricated with just a little bit of silicone grease so that it doesn't wear out as quickly and needs less capacitance.
Advised if you want to have an older type 3 controller whose stickbox is too loose and wobbly serviced to have the stick feel like new again.
If you prefer slightly broken-in sticks, I also have lightly used T3 stickboxes for 18€, shortcode S3T3b.

[S3T2] Stickbox replacement (new T2) [+15€]

For controllers with type 1 or 2 stickboxes, I can solder in a new original type 2 white stickbox for +15€, lubricated with just a little bit of silicone grease so that it doesn't wear out as quickly. I always do so when the controller came with a type 1 stickbox, as those are inherently inaccurate with notch values.
Alternatively, if you prefer the feeling of slightly broken-in sticks, I also have lightly used T2 stickboxes for 13€ (shortcode S3T2b).
If you order an old black, purple or orange controller with its original T2 stickbox, it will be considerably looser than a new one in terms of control stick spring resistance. While I will not sell controllers with stickboxes so loose that they are no longer accurate, some people prefer the feeling of new stickboxes (high stickbox spring resistance helps with stick jump short hop and PC edgehog, for example). If you prefer a controller that feels like new bought in 2002 over more broken-in ones, going for a new T2 stickbox is the better choice.

[S3T4] Stickbox replacement (new T4) [+10€]

For controllers with type 1 or 2 stickboxes, I can solder in a new type 4 black stickbox for +10€, lubricated with just a little bit of silicone grease so that it doesn't wear out as quickly. The "type 4" stickboxes only surfaced relatively recently and has been used in original Nunchuks. They come with original black Noble potentiometers.
Unfortunately, T4 stickboxes always seem to have a loose zone too large for the very high precision needed in Melee, especially when coupled with the A2 and A3 mods I offer. Because of this, I only recommend this service for controllers intended for Smash 4, Smash Ultimate, Slap City or other games, for which they are easily precise enough.

[S3T3E] Stickbox exchanging (type 3) [+5€]

Previously offered under the short-code [A0].
The stickbox used for the C-stick (type 3 black) has 20% lower spring resistance than the one used for the control stick (type 3 white). So if you like controllers with little disjointed zone, but also low initial spring resistance, which you usually get after breaking in a controller for a few months, starting with a T3B stickbox for the control stick might be a good idea to skip the breaking-in period.
You should be aware that some techniques like stick-jump short hop and pivoting will be more difficult / require other timings with the S3T3B mod.

[S3T2E] Stickbox exchanging (type 2) [+15€]

The older stickbox designs can also be swapped by desoldering and resoldering them. These types also have black sub-types with lower spring resistance that are used for the C-stick by default.

[S4] Stickbox spring resistance increasing or decreasing (type 3) [+10€]

Instead of replacing the stickboxes, it's also possible to replace the stickbox spring with a weaker type in order to reduce the control stick's resistance, or to increase it by adding a spacer disc. The maximum possible difference in spring resistance is about 30% in either direction. The amount of change you want is up to you, in multiples of ±5%. Example: [S4+10] would increase the resistance to 10% over what controllers are shipped with by default.

[A] Octagon gate modifications

Options here change the way the sticks move against the stick gates, in terms of re-aligning default notches and adding new ones.

All sections with arrows on the left can be extended by clicking on their title. Some of them, especially A2, are quite extensive, so they are collapsed by default.

The hybrid gate shape I invented in 2015 helps with all kinds of diagonal directional inputs universally: Fox, Falco and Sheik (etc.) up-B angles, wavedash and airdodge angles and DI.
It is ideal in terms of preventing the control stick from reading dead-zone inputs when intending to hit the slight diagonal angles just outside of the dead zone, yet keeping the angles close to these 'perfect' angles equally accessible as with an unmodded stick gate.
This is achieved by filing the slopes into a perfectly straight or slightly concave shape that doesn't 'pull' the stick into either of the adjacent notches.

If you don't care about keeping angles between the 'perfect' (retainer notch) and regular diagonal notches (NE, NW, SW, SE) accessible, I recommend going for convex notches instead, which make the retainer notches as well as the regular diagonal notches more consistent at the cost of consistency at the angles between these two.
I currently offer these retainer notch styles:
• A2a: regular hybrid gate with straight octants for even angle access. If you want access to all upwards up-B angles even if it means that it's a bit more difficult to hit the retainer notch consistently, this style is the most suitable.
• A2b: slightly convex octants, for a medium increase in how easy it is to hit the retainer notches. Recommended if you want to keep some consistency at in-between angles.
• A2c: strongly convex octants, for a high increase in how easy it is to hit the retainer notches. Recommended if you don't care about in-between angle consistency for the respective octant. On the southern half of the gate, if you only need min, max and default notch wavedash lengths, this is the option to go for.
• A2d: shallow hybrid gate with straight octants. Good if you prefer no added resistance towards circling motions and just want very slight tactile feedback hints towards where the game's dead zone threshold is.

The illustrations below show the shape in detail. Click on them to view in high resolution.
A2ae and A2af are shapes I used to do as default in the past, and while they do have their advantages as well as usages cases where they are ideal, those are rather rare. For previous customers who had them and prefer them just like that, I've still included them for completion's sake.


A full retainer notch gate from me is 160€, but it's also possible to only order certain octants. For example, if you just order [A2a (ESE, WSW)], these are 2 out of 8 octants, so the price will be 40€. (ESE = East South East, the portion of the gate responsible for max-length wavedashes etc. towards the right)

Tuned value: By default, I tune all notches to offsets of 0.32 to 0.36. This is a range that is still close enough to the "perfect" value of 0.28, but far enough from the cardinal deadzone range (up to 0.27) to last a long time until being worn out.

Still, for people who prefer angles as close to perfection as reasonably possible, I also offer tuning the values to a range of 0.30 to 0.32. Please note that in this case, I can only guarantee notch values under warranty for 3 months instead of 6 months.
Please request these offsets individually – for example "A2a full, ESE & WSW 0.32" will get you 0.32-0.36 on all octants except for ESE and WSW, where the offsets will be at 0.32 or below.

For a comparison of the difference that is effectively made by these two sets of notch values, please check out the diagram on the right. On the top, you see Fox's starting position before the wavedash. Right below is the maximum length wavedash you get with 0.28 notches (maximum perfection, but very short lifespan). 0.32 gives near-perfection and medium lifespan, 0.36 is still quite close to perfection and long lifespan.

Finally, 0.70 is the default south-west notch wavedash on unmodded controller gates and gives about 60% of the distance of a max-length wavedash. As you can see, the increase from that to a a 0.36 notch is still significant, whereas the further upgrades by going to 0.32 or 0.28 are quite minimal.

The hybrid gate is fully compatible with other gate mods like A3 (shield drop notches). If you order any of the bottom half octants, I will also make sure that the notch values fall within the UCF shield drop range without an extra charge.

Legacy modification for vanilla Melee. Nowadays, I only advise opting for this if you don't have access to UCF at your local tournaments. The vanilla (unmodified) Melee shield drop range is right at the border of the UCF shield drop range, so tuning your notches into this range makes them tend to wear out more quickly than keeping them within the UCF shield drop range, causing your character to eventually get stuck in shield angling instead of shield dropping.

I finish the notches properly so that on the first glance, the notches look just like they do on vanilla controllers. So if it seems to you that I simply forgot to add them, please try the controller out first and see whether it shield drops well before inquiring about this to me.
These shield drop notches only work in Melee. Not in Project M, not in Smash 4 or Smash Ultimate.
If you only need the shield drop notches to cover Melee with UCF enabled, I make sure of that free of charge on every controller bought from me directly. On controllers that are sent in by you, I charge 15€ to align the notches into the UCF shield drop range if they, in the condition you sent them in to me, are outside of this range and you want me to fix this. (Shortcode A3b).

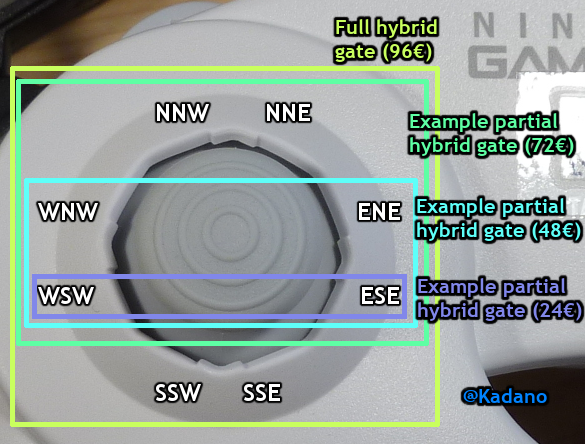
When you order this mod, the hybrid gate mod has to be reduced / altered somewhat. I will add notches that allow for quick targeting to trigger a forward tilt out of smash turn and are as close to the shield drop range as possible. In other words, the shield drop notches will be expanded a bit to also function as pivot ftilt notches, depending on input type and movement strength.

For characters that can angle their forward tilt, the added notch will always trigger a down-angled forward tilt.

Due to their proximity to the shield drop notches, the life span of pivot ftilt is limited, especially when using overly strong pressure against the gate while moving (rotating) the stick. So I recommend to only consider this mod if you press the stick rather softly against the gate.

[A5] Ice Climbers: Solo-dash notches [50€]

Only Popo will dash, not Nana. Done by adding notches slightly above SE and SW, y value of -0.8. Will take longer to do since this needs to be super-accurate. When this is elected, hybrid gate mod has to be reduced somewhat.
This technique requires single value range precision. Even if I align the notch perfectly, it will still be hard to perform it consistently, since you need to both press the stick from the correct direction and, in case your control stick has a loose zone greater than 1, calibrate it properly. So in any case, this will work less consistently / require more precision to work consistently compared to shield drop and A2 notches.

[A6] Ice Climbers: Solo-jump notches [50€]

I move the NE and NW notches slightly to the sides so that hitting these angles will only cause Popo to jump.
This technique requires single value precision. Even if I align the notch perfectly, it will still be hard to perform it consistently, since you need to both press the stick from the correct direction and, in case your control stick has a loose zone greater than 1, calibrate it properly. So in any case, this will work less consistently / require more precision to work consistently compared to shield drop and A2 notches.

[A7] Ice Climbers: Solo dash-jump notches [60€]

Like A6, these notches are NE and NW notches that are shifted sideways, but much more so due to different values being needed.
Two subtypes are possible:
A7a: Dash → solo-jump notches: both Ice Climbers will dash for one frame, followed by jumping on the next frame. The secondary Ice Climber will also dash, but come to a stop quickly.
A7b: Solo-dash jump notches: the main Ice Climber will dash for one frame and then jump, while the other one will only walk and neither dash nor jump. The input value range here is larger than for A7a, so if unsure, I recommend going with A7b for its higher consistency.

While it is not possible to get both A7a and A7b on one side, it is possible to get one of them on the left side and the other on the right side.

The A7 notches also make the NE and NW notches have lower vertical values, since the material that the lower part of the stick knob stem typically makes contact to is reduced. As such, DI to those notches will work differently.

It is also possible to do these notches in a way that they sit below the NE / NW notches (which also may be turned into A6 solo-jump notches), however doing so works much less consistently, so I don't recommend it.
See below for a stick gate with A7b notches (default recommended style) on the left and one with A7b notches (added style) that also include A6 above them on right. Both of them also have hybrid gate notches for the ENE, WNW, WSW and ESE octants.


This technique requires single horizontal (and, in A7a's case, also vertical) value precision. Even if I align the notch perfectly, it will still be hard to perform it consistently, since you need to both press the stick from the correct direction and, in case your control stick has a loose zone greater than 1, calibrate it properly. So in any case, this will work less consistently / require more precision to work consistently compared to shield drop and A2 notches.

[A8] Ice Climbers: Solo-smash notches [70€]

C-stick modification. Adds notches to the C-stick where only one Ice Climber will do a smash attack. Has two sub-types:
A8a: left and up as well as right and down are fsmash, left and down is dsmash, right and up is usmash.
A8b: left and down as well as right and up are fsmash, left and up is usmash, right and down is dsmash.
This technique requires single value range precision. Even if I align the notch perfectly, it will still be hard to perform it consistently, since you need to both press the stick from the correct direction and, in case your control stick has a loose zone greater than 1, calibrate it properly. So in any case, this will work less consistently / require more precision to work consistently compared to shield drop and A2 notches.

[A9] Up- and down-angled forward smash notches [30€]

C-stick modification. Adds notches to the C-stick where angled smash attacks are triggered (only with characters that have these, like Samus, Captain Falcon, Ganondorf etc.).


C-stick modification. Adds notches to the C-stick for ideal DSDI to collide with the platform if hit out of late backwards tech-roll. Please refer to the infochart on the side; open in a new tab to see the full details.

If, for example, you opt for the leftmost set (to cover both vertical knockback and up-away knockback attacks), there are two pairs of notches to be added, so this combination would be 40€. (Each pair is done for both the left and the right half of the C-stick, of course.)

Should also work for other fast-faller characters, might not be 100% optimal to the degree that I confirmed it to be for CF with extensive testing. Subject to further research by myself in the near future on request.

[B] Button modifications (including shoulder triggers)

Unmodified original triggers have several issues that cause problems both for long-term hand health and for performance in Melee.
While below I list the individual modifications I can apply and their prices, I also have a longer trigger recommendation document that explains ideal combinations of them more thoroughly. I recommend you to check it out and read through it before sending me an order request.

To expand the detailed descriptions of the individual mods I offer, click on the expand text below.

[B1] Spring removal [3€]

This eliminates lightshielding in L / R. Can be useful for powershielding, but is bad for L-cancels since they’ll interfere with airdodges and teching. Not recommended for solo-trigger use. In fact, I don't even recommend this for digital-only triggers, since the click response tends to be sluggish. For my recommendations on digital-only triggers, please check out my longer trigger recommendation document.

[B2a] Constant trigger depression [8€ per side]

Decreases the distance the shoulder triggers stick out of the controller. It makes powershields easier since the distance you have to move to reach digital press will be shorter. You can still lightshield and soft press for L-cancels. Tutorial on how to apply this by yourself: https://twitter.com/Kadano/status/697430340898521088
B2a is known to cause problems on Wiis and Wii Us which don't have Native Control enabled in Nintendont. On vanilla Gamecubes and Wiis or in Nintendont with Native Control enabled, B2a does not cause any problems.

[B2b] Trigger point elevation [8€]

Inserts a spacer to decrease the amount of movement necessary until digital press.
The idea is similar to B2a, but this will elevate the digital press point instead of lowering the neutral trigger position. This is generally recommended if you have rather long fingers and don’t want to claw as much for pressing L / R.
By default, I keep 20% of the original analog range, so you can still soft-press L-cancel and lightshield. If you want a different percentage remaining, please specify so.
I carve these spacers out of wood with a smaller diameter than the spacers that people usually 3D-print these in. This has the advantages of slightly decreasing click resistance, decreasing effective friction and making triggers that have inconsistent digital L/R inputs perform consistently instead.
Additionally, I produce and bin them in a multitude of different lengths, measured to the accuracy of 0.1 mm. By default, I recommend 19.8 to 20.0 mm length. If you prefer only the tiniest of analog range, you can go with 20.1 to 20.3 mm. If, on the other hand, you like to have slightly stronger analog shields still accessible, something in the range of 18.0 to 19.4 mm should be suitable to you.
Finally, for people who only want this spacer to fix their inconsistent digital trigger clicks, the minimum length is 17.2 to 17.5 mm, which will not change the click position from vanilla noticeably, yet remedy the inconsistency problem.

[B3] Analog slider disabling [0-6€]

Makes it impossible to lightshield for that trigger. Recommended if you don’t use one of them at all but press them accidentally occasionally, or if you want to have one of the triggers as a dedicated digital-only button. Always added when B1 is ordered for that trigger to prevent accidental lightshield.
B3a is applied by holding the grey trigger piece down while putting the backshell on the PCB, so that it does not catch the potentiometer slider. As such, it is easy to undo – all you need to do is open up the controller, lift the backshell up and put it back on without holding down the trigger.
Conversely, re-applying B3 after opening the controller is a bit more tricky, especially when it's combined with B2a or B2b. You need to find a very specific amount to hold down the trigger as you put on the backshell – too shallow and the grey trigger latch will still grab the potentiometer slider, too deep and the click dome will be pushed out and accordingly, digital inputs will not work well.

If you want to avoid this hassle, I also offer installing a small retainer that by default limits the upwards travel of the grey trigger piece to the ideal amount. This way, you never need to pay any attention to holding down the trigger as you put on the backshell when re-assembling the controller.
Additionally, if you do want to undo B3 (and thus re-enable the analog slider input), all you need to do is rotate the small plastic retainer piece vertically by 90°, making it not have contact with the grey trigger piece any longer.
This installation has the shortcode B3b and is 6€ per side. See below for photos of it on the R trigger:

[B4] Silicon oil application onto the inner tube [1€]

Recommended with all controllers, but especially the ones produced in 2008 and later. These tend to have triggers that get stuck when pressing at a diagonal angle; lubing the tubes with silicone oil often helps to remove this problem. 1€ per trigger.

[B5] Click resistance decreasing [4€]

Decreases the amount of force necessary to trigger a digital shoulder button press by perforating the rubber plates. This will also make L / R digital presses more silent. Recommended for powershields. Should also cause less finger strain. By default, I will decrease click resistance to 3.2 N / 320 gf (default on new controllers is 500-550 gf); if you want more or less, please specify accordingly. (For example B5L320R400 if you want 320 gf resistance on L and 400 gf on R.)
Can also be done for ABXY buttons (24€ in total if you want all rubber plate buttons (ABXYLR)).
I measure all click resistances with analog tension gauges and save them into a table for future referencing when you order B5.

[B6] Spring resistance decreasing [4€]

Removes a part of the spring to reduce analog spring force. This will decrease the amount of force necessary to pass through the analog L / R press zone or to get to the digital Z click. Can make powershields slightly easier (only for L and R of course).
By default, I aim for 100 gf analog resistance, with the original one varying between 120-140 gf from controller to controller. Other specific resistances are possible too, please specify in the format B6L110 (example: 110 gf on left trigger).

[B7a] Button height decreasing [15€]

Sometimes preferred for the Y button if you do inputs on it in a “sliding” way. The photo comparison that shows the difference this mod makes.

[B7b] Reshaped buttons (ABXY,start,D-pad)[25-40€]

Ergonomically optimized set of front buttons cast from resin. Shape invented and carefully optimized by me, duplicated in resin by GonzoMod. The shape helps the most with sliding inputs between B and Y, but to a lesser degree also with sliding inputs on X. Start and D-pad are reshaped in a way that prevents accidental pauses and taunts. The Z button is not reshaped.
Prices: 40€ (full set) / 30€ (ABXY only) / 25€ (ABY). Individual ABXY buttons are 10€ each, start is 3€ and D-pad is 7€.

[B8] Trigger silencing [5€]

Decreases the volume of the noise a trigger makes upon digital click. 5€ per side (L/R). Here is a comparison between a controller with unmodded loud triggers and a controller with B2b, B4, B5, B6 and B8 applied on both L and R:

[B9] FIRES PTFE tape trigger centering [20€]

Decreases the sideways play of the gray trigger pieces, for more accurate lightshield values and a better feeling. 20€ per side (L/R) or button (A/B/X/Y). Credit goes to FIRES for developing and sharing this technique.

[B10LR] (*new in 2020*) Trigger limiting circuit installation [50€]

Intercepts one or both triggers' analog signal to limit them within ranges that can be tuned by the user. Allows for consistent minimum strength analog inputs, so that you consistently get a max-size lightshield no matter how far down you push the trigger.
For this functionality, I solder in a daughter-circuit on the upper side of your controller's PCB that I developed. You can adjust the analog thresholds with 4 trimpots.

I just recently developed these boards and don't have much documentation yet. I can provide more details upon email request if you want to order them installed, or buy several from me to install by yourself.

[B11] D-Pad or start button reshaping [10€]

Some people have the habit of performing stick flick inputs, especially when pivoting, in a way that causes them to slip to the D-Pad with their thumb, which can cause accidental taunts.
To prevent this, I offer reshaping the D-Pad so that the upwards part no longer protrudes from the shell. Intentional upward inputs are still possible, they just require a slightly different input method.
I also offer a start button height reduction, making it so that only pressing the button in very deeply with your fingernail can cause a start button input, for people who tend to slip off onto the start button.

[B12] Mouse click Z / ABXY / LR (*new in 2022*) [30-40€]

Particularly for people who want to remap L/R/Z to jump, going with a mouse click switch is recommended for short hop consistency.
For A, B, X, Y or Z, each of these buttons is 30€ (ABXY only available on PhobGCC). Button stabilizing (B9) is included in the price. I recommend only going for mouse click A/B/X/Y if you have tried it extensively before, as quite many customers decide that they prefer regular ABXY press after a few days of trying mouse click switches.
For L or R, one trigger is 40€. The trigger installation is reversible without soldering (the trigger daughterboard wires have connectors that can be unplugged). By default, mouse click L/R comes as a digital-only trigger without the spring. If you still want to keep analog (lightshield / SSBU shield) functionality, please let me know.
Mouse click L/R press is much, much lighter than regular LR press. Unmodded controllers typically have effective click resistances of 450-570 gf, modded triggers as I recommend to get them have 250-340 gf, and mouse click triggers take as little as 45-120 gf of press resistance. If you have issues with index finger pain from the high force required with stock triggers and think you'd prefer the mouse-click sensation, you might want to give this a try. For L and R, I recommend also considering B12 instead.

Mouse click Z switch options and their average click resistances: Kailh mini blue (48gf), Omron D2LS-21 (55gf), Kailh mini TP grey (58gf), Omron D2LS-11 (121gf). For reference: stock Z switch only is 40 gf, typical effective resistance (with spring that I remove for mouse click Z): 250 gf.
Example order notation: "B12Z (48gf)" or "B12Z (Kailh mini blue)"

[B13] Keyboard switch LR (*new in 2022*) [30€]

This mod only supports digital-only triggers currently, so I only recommend it if you want to have no lightshield on the respective trigger. Compared to mouse click LR, keyboard switches have a much longer travel, but force and distance required are still less than on regular stock click pads. All LP switches are installed with hot swap sockets, so you can replace them for different compatible ones by yourself without soldering.
Available clicky switches: Kailh LP Robin (52gf), Kailh LP White (57gf), Kailh LP Light Blue (58gf, light click), Kailh LP Jade (58gf), Kailh LP Navy (60gf), Kailh Navy (68gf)
Available tactile switches: Kailh LP Brown (47gf), Kailh LP Orange (65gf)
Available linear switches: Kailh LP Red (48gf), Kailh LP Yellow (65gf)
Example order notation: "B13R (Kailh LP White)"

[D] Extra parts & tools / parts removal

[D1] Control-stick-type stick knob (third party), replaces C-stick [3€]

Useful for thenar grip (doing aerials with the bottom part of your thumb on the C-stick). Your original C-stick knob will be in the box too, of course.

[D2a] Rumble motor deactivation [2€]

[D2b] Rumble motor removal (decreases weight) [2€]

[D3] Tripoint screwdriver: simple (red transparent) [1€] / high quality [4€]

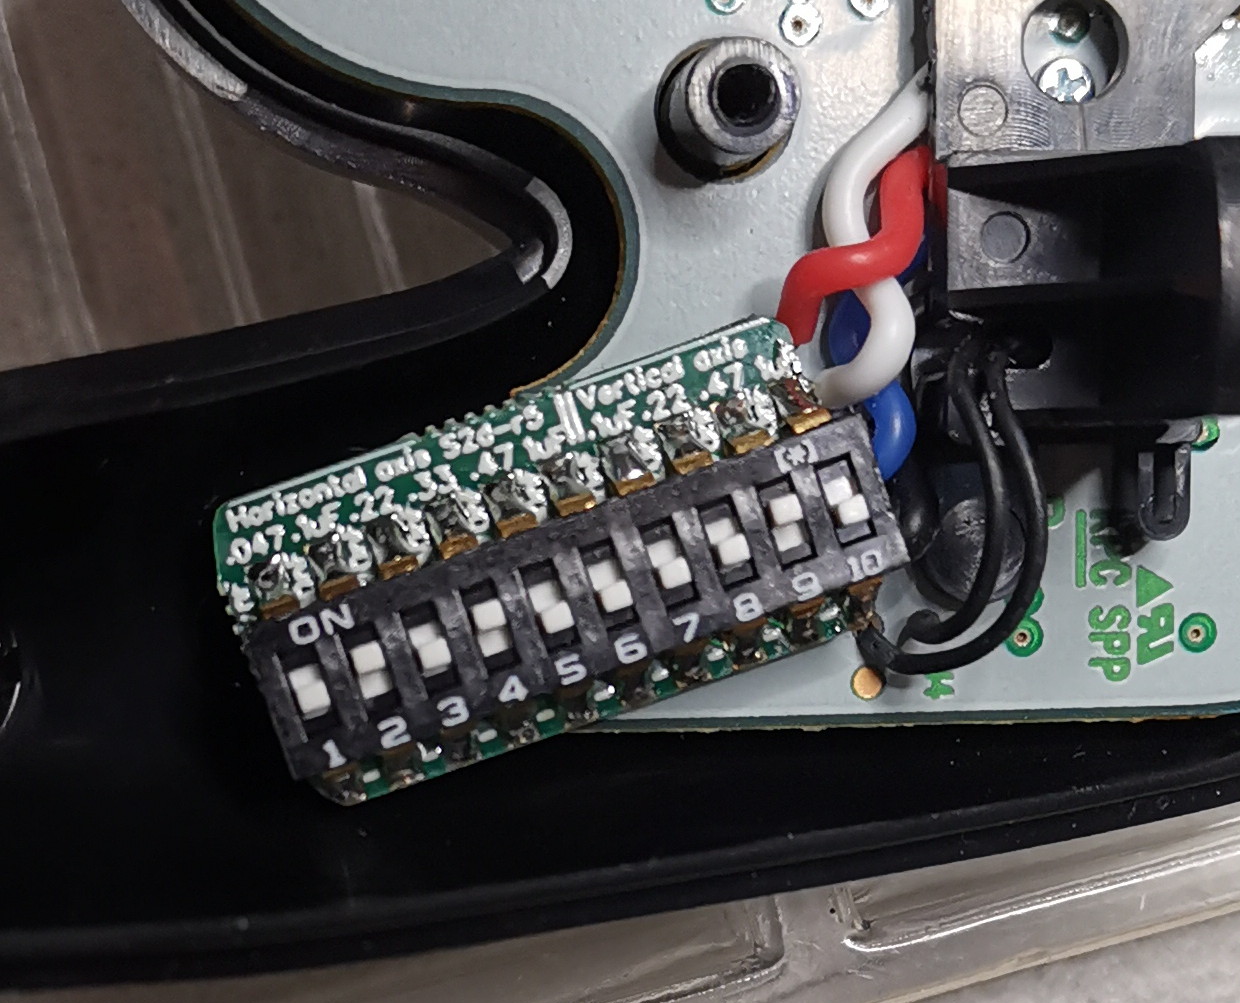
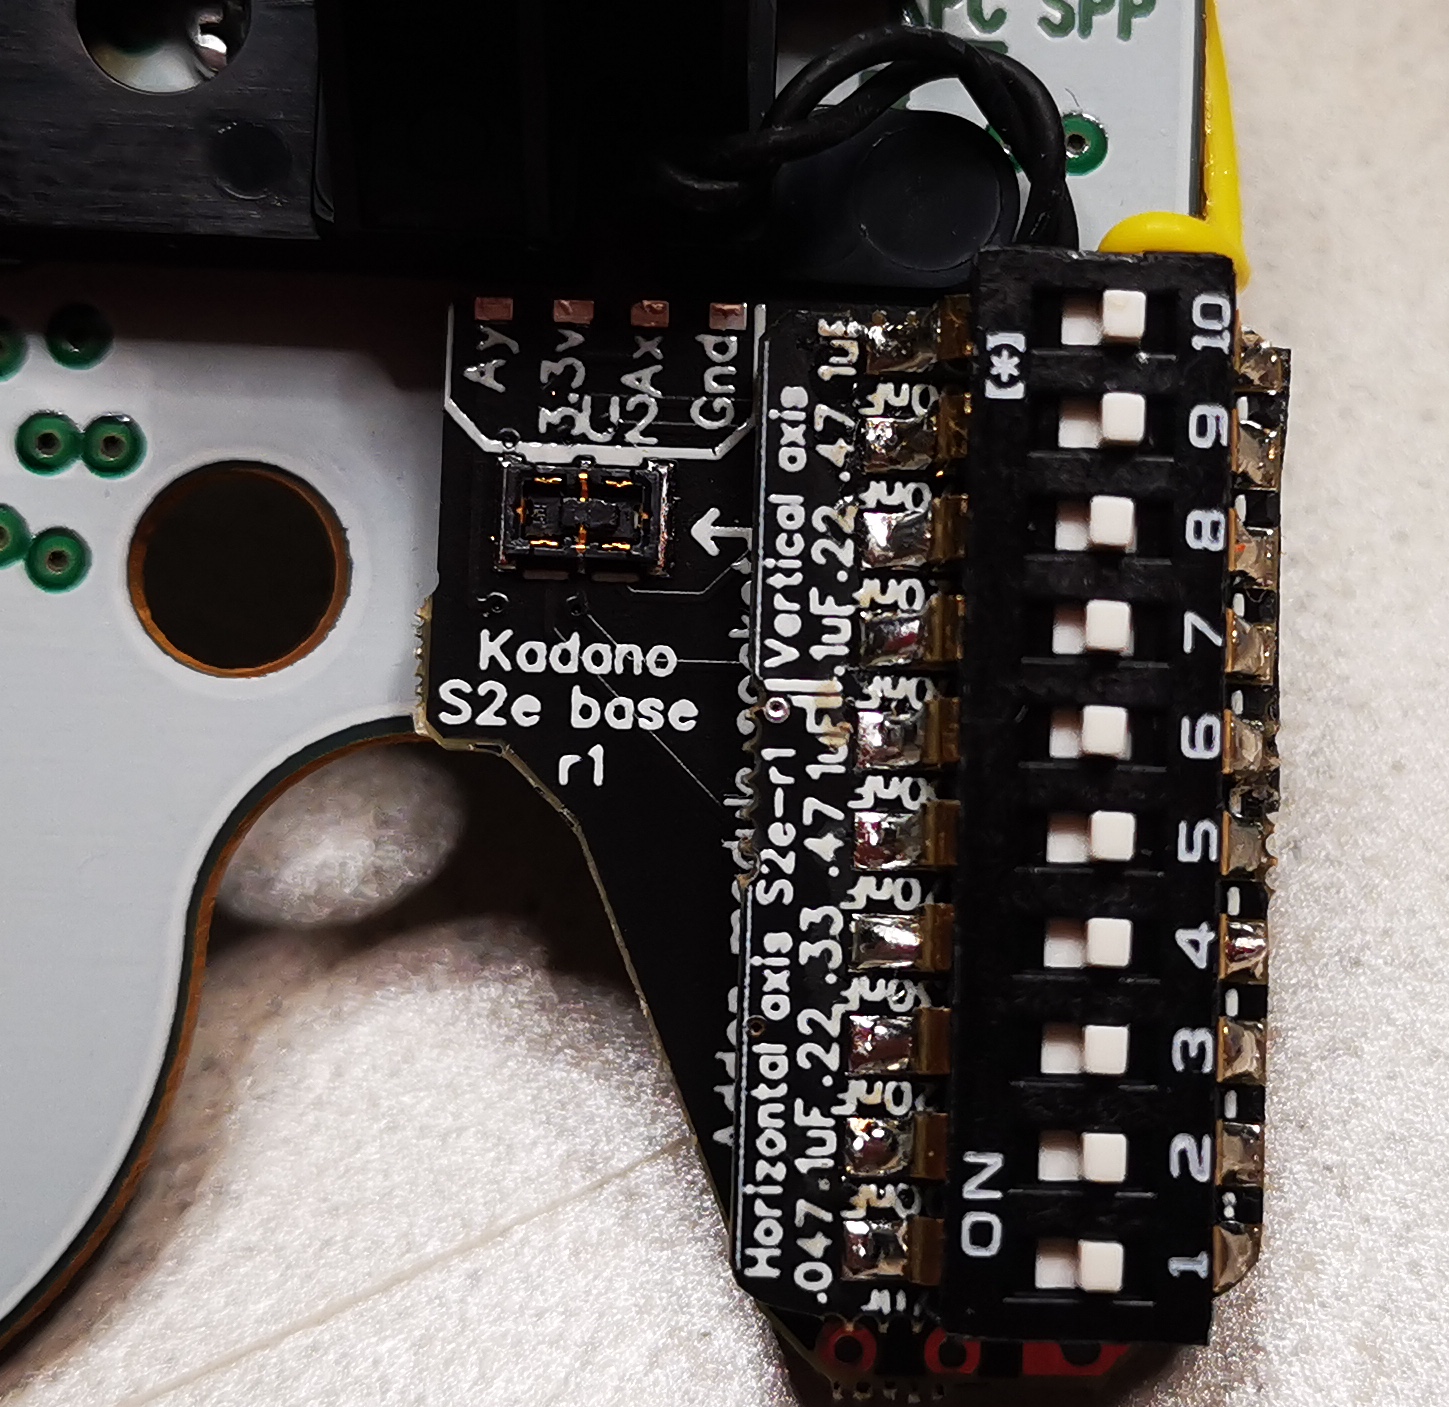
With every modification that requires occasional internal adjustments by the user, you can either get the cheaper one for free or the higher quality one for 3€.
In the picture, you can see how they differ. The high quality one has a more sturdy tip and a more comfortable handle that makes it much easier to take the screws out quickly.

[D4] Fine tweezers [5€]

Fine tweezers are useful for replacing trigger parts, especially click domes (B5) and click elevation spacers (B2b). If you are replacing potentiometers by yourself, they are also ideal for unclipping them from the stickbox so that they can be desoldered and removed.
For replacing trigger click domes, they are not strictly necessary – even with just a tripoint screwdriver, you can replace them without needing to disassemble the trigger mechanism (see video below). However, faster and easier is to use fine tweezers.

[D5] Screw replacement [2€]

By default, controllers are shipped with their default screws: 6x tripoint for the outer shells and 4x PH1 (Philips size 1) for the triggers.
The original trigger screws are of relatively low quality and easily wear out, especially when using screwdrivers that are too small or of low quality. Once screws are completely worn out, removing them is a massive pain, so you should avoid it getting to this point.
If you plan on undoing the trigger screws every now and then, be it to deep-clean the controller or to replace the trigger springs, upgrading the screws to more sturdy ones can be a good idea.
For 2€, I replace the four black PH1 screws for silver high-quality tripoint screws. These can be turned with the same tripoint screwdrivers as you use for the 6 shell screws, which is practical as you then only need a single screwdriver. (The high-quality yellow ones I am selling are ideal for this.)

Alternatively, under the shortcode D5b, I also offer instead replacing the 6 tripoint screws for PH1 (Philips / + shape) ones, also for 2€. This can be a good idea if you already have a good PH1 screwdriver that you prefer using (I recommend Wiha PicoFinish 261P PH1).

[E] Electrical modifications

Depending on the ruleset used at the tournaments you attend, some of these options might be banned. Please make sure you always check back with the TO in case the ruleset wording isn't clear on this.

[E1] Button remapping [15-30€]

Assigns a physical button to a different in-game button press. I can also assign light-press L / R to digital inputs or digital buttons to specific analog inputs. This is a bit more expensive because more work is involved, so it's 30€ for that.
Note that digital→analog inputs that trigger stick inputs will only work if the corresponding stick is in neutral position while pressing the button.
Specify in this way: E1[light press R press causes Z input, A press causes Y input].
With E1[full press R causes analog press R], you can make a controller use the click input of the controller for shielding and airdodging in Smash 4 & Ultimate. This is available as a regular remap (15€) or as a double bind (full press R causes digital and analog press R) for 30€. The latter allows you to have the tactile click sensation trigger a shield / airdodge in both Melee and Smash 4 / Ultimate, for maximum flexibility.
Digital-digital remapping, like Z<->X, can be done as a toggle, so you can always easily revert it with the flick of a switch. Going for a toggle installation is an extra 15€

[E2a] Arduino adapter cable with logic converter [40€]

As an adapter cable, the Arduino functionality can very easily be removed in case that's ever needed. It can thus be used with any controller you like rather than being bound to a single controller.

[E2b] Arduino installation with logic converter [60-80€]

Installation of an Arduino, electrically connected with enamelled copper wires and mechanically connected with hot glue and wooden sticks for stability (preventing mechanical strain on the cables of a loosely inserted Arduino ruining the wire solder points). By default, I recommend the installation with a switch that allows completely disabling the Arduino (80€). When the switch is flipped to off, the controller will function 100% like if the Arduino wasn't there, which can be easily confirmed by the Arduino's lights not even being on. Since this installation is more complicated to do in a way that still allows replacing potentiometers for maintenance, I have to charge more for this installation than simply installing the Arduino as always-on without a switch (60€).

Specialties

Other things I offer that are not directly related to Gamecube controllers, but somewhat tangentially related and might be interesting to you as well.

Mayflash VGA005 (cap-modded) [40€]

The Mayflash VGA 005 is one of the most practical options to get 480p VGA signals from your Wii. That in turn allows you to play on CRT PC monitors in 480p with excellent clarity, which is less fatiguing for the eyes and sharper than typical 480i CRT TVs. It also allows you to use a single CRT monitor for both console play and netplay – ideally you use a CRT monitor with two input ports.
It's currently out of stock everywhere, however I still have a few pieces in overstock where I have already replaced a capacitor to fix the problem it has by default (going black for a second or two whenever the in-game picture transitions from bright to black).

Various rare 480p VGA distributing, amplifying and recording devices

From back when I used to host tournaments at my place and had a versatile installation for optimal lagless 480p console play, I have several useful devices left that I now let go off. If you intend to set up a high quality lagless console station, either for use by yourself and friends or for tournament use, feel free to ask me for advice in which parts you'd best buy.
Most of these have been imported by me from the US at high costs. As such, some of them might be more interesting to people in Europe as they can be found for affordable prices on ebay.com, yet with prohibitive shipping costs to Europe. (Example: Extron PA 250 for 19 USD + 76 USD shipping to Europe.)

Extron MVX 84 (50€): VGA input-output matrix switch. Powered by AC supporting 100-240V. MSRP 1990 USD. Allows assigning 8 VGA and audio inputs in any way you like to 4 VGA and audio outputs. As such, it can be used to distribute Wii / Gamecube console video and audio signals to multiple CRT or LCD monitors, VGA capture cards and amplifying devices (to increase the brightness on older CRT monitors that have become too dim when connecting directly). Has an RS232 input so that you can remotely reassign inputs to certain outputs or recall saved configurations.
Extron MVX 88 (100€): VGA input-output matrix switch. Powered by AC supporting 100-240V. MSRP 2990 USD. Allows assigning 8 VGA and audio inputs in any way you like to 8 VGA and audio outputs. As such, it can be used to distribute Wii / Gamecube console video and audio signals to multiple CRT or LCD monitors, VGA capture cards and amplifying devices (to increase the brightness on older CRT monitors that have become too dim when connecting directly). Has an RS232 input so that you can remotely reassign inputs to certain outputs or recall saved configurations.
Extron PA 250 (40€): VGA (RGBHV / 5 BNC) peaking and brightness amplifier. Powered by AC supporting 100-240V. MSRP 870 USD. Increases VGA brightness / contrast levels for making CRTs much brighter. If you connect it to a VGA device, you'll need a 5BNC to VGA cable, which I sell for 5€ each.
Extron CVC 200 (70€): YPbPr / component (3 BNC) to RGBHV (5 BNC) VGA converter. Powered by AC supporting 100-240V. MSRP 1070 USD. Higher picture quality than Mayflash VGA005. As all the other Extron devices, these were used in professional video and broadcasting studios, so the quality is far above consumer level. If you want to get 480p VGA from your Wii in the highest quality, so that you can connect it to CRT PC monitors or similar, this is the best choice to my knowledge.
StarTech PEXHDCAP (Yuan SC500N1-L/DVI) (50€): YPbPr / DVI / VGA / HDMI capture card (with audio) for desktop PCs (PCIe connection). Supports 240p to 1080i60 / 1080p30. One of the few VGA capture cards available for affordable prices. Two pieces available.

Deodorant cream

Prevents sweat stench from bacterial apocrine sweat break-down for 2-5 days (or less if you wash the cream off earlier). Useful for preventing body odour even when at a tournaments where showering is not possible or practical (due to long queues or distances, for example). For more details, please refer to the subpage.
Offered with different scents (perfume oils) or, alternatively, without any scent (faint smell of the natural oils used then).

Available in different consistency editions: 18C, 20C, 25C and 28C. The consistency will be ideal at the respective room temperature, for example the 25C edition is just right at about 24-30°C room temperature, but tends to be too hard in cold rooms in the winter (16-20°C).


Sizes and prices:

Shipping costs

I mainly use Austrain Post: International registered priority air mail (with tracking number).
To the US, FedEx is usually the fastest option. They typically take 2-3 days to deliver, however with 75€ it's much more expensive than Austrian Post Priority for 20€, which takes 1-2 weeks usually.
To most Europeans countries, UPS or Austrian Post are ideal in terms of price (12-20€) and speed (2-6 days usually).

When going with Austrian Post, shipping costs are:

Target countryAmount of controllersShipping costAverage shipping time (calendar days)Min. shipping timeMax. shipping time
USA, Canada120€10523
USA, Canada220€10523
USA, Canada325€10523
USA, Canada425€10523
EU114€427
EU214€427
EU314€427
EU420€427


For only ordering deodorant, I also offer untracked priority batch business mail, for 5€ to EU countries / 10€ to all other countries. If you want there to be tracking, it's an extra 3€. Inquiries towards parcel status are only possible if a tracking number was purchased for that shipment.
Since these cheap rates are only available in large shipment batches, I'll only send your deodorant order within my next large shipping batch (usually every other month, once to twice a year as of 2021 due to the COVID pandemic). Also, shipping times with this method have been very inconsistent since early 2020. It might take only 2 weeks, but also up to several months.
For untracked shipments, I can re-send them if they haven't arrived within 6 months after shipment. For tracked shipments, I can re-send them after two months once Austrian post has confirmed that the parcel is lost and have issued me a refund.

Impressum / Imprint | Terms & Conditions